If you have ever dealt with a glitchy webcam, a printer that refuses to acknowledge your existence, or a Bluetooth mouse that has decided to take a permanent vacation, you know that the Device Manager is your best friend. It is the central hub where Windows 11 keeps a watchful eye on every piece of hardware connected to your machine. However, as Microsoft continues to redesign the Windows interface, moving things around from the classic Control Panel to the modern Settings app, finding this essential tool can sometimes feel like a digital scavenger hunt. You do not need to be a certified IT professional to navigate your system efficiently, but knowing the fastest paths to the Device Manager can save you a massive amount of frustration when things go sideways.
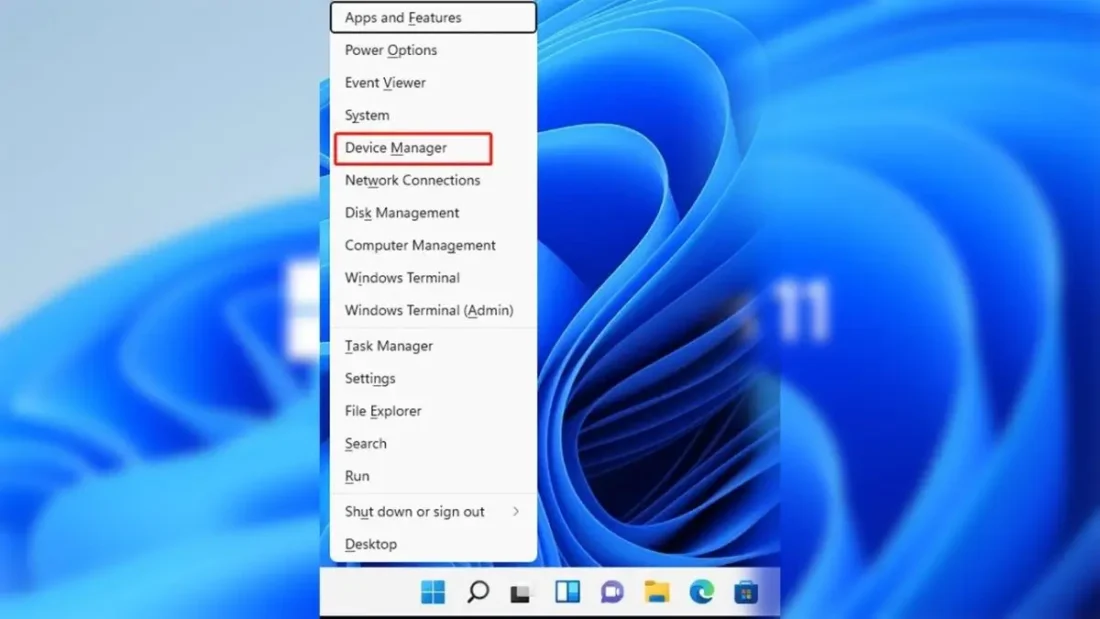
The absolute fastest way to get where you need to go is a trick that many veteran Windows users swear by, and it is hidden right in plain sight on your Taskbar. If you right-click on the Start icon—or simply press the Windows key + X on your keyboard—a secret “Power User” menu pops up. This menu is a goldmine for anyone who wants to bypass the fluff of the standard Start menu. Within this list, you will see Device Manager sitting right there in the middle. One click, and you are in. This method is incredibly reliable because it works regardless of what you have pinned to your taskbar or how cluttered your desktop might be. It is the “emergency exit” of Windows navigation, providing a direct line to system tools without forcing you to click through five different layers of the Settings menu.
Windows 11 Users Beware: Microsoft Just Dropped a Second Emergency Fix for a Botched Update
Of course, if you are the type of person who prefers to let the computer do the finding for you, the Windows Search feature is your next best bet. Simply hitting the Windows key and typing “Device Manager” will bring up the tool instantly. One of the best parts about Windows 11 is that its search functionality has become much more intuitive than previous versions. You don’t even have to finish typing the whole phrase; usually, by the time you hit the “v” in “Device,” the correct icon is already highlighted and ready for you to press Enter. This is the go-to method for most casual users, but there is a slight catch: if your Windows Search index is acting up or if your system is lagging, this might take a second or two longer than the keyboard shortcuts.
For the speed demons and those who love the “cool factor” of using commands, the Run dialog box is a classic power move. By pressing Windows + R, you open a small box that allows you to launch any program if you know its specific filename. For the Device Manager, that name is “devmgmt.msc.” It might look like gibberish at first, but once you memorize those few letters, you will feel like a wizard. Typing “devmgmt.msc” into the Run box and hitting Enter bypasses the entire graphical interface of the Start menu and the Search bar. It tells Windows exactly what process to start immediately. This is particularly useful if your graphical interface is acting glitchy or if you are working on a computer where the Taskbar has frozen, but the system shortcuts are still responsive.
If you are already knee-deep in a terminal window, perhaps because you are running scripts or checking network settings, you do not have to leave that environment to manage your hardware. Both the Command Prompt and Windows PowerShell can launch the Device Manager with that same “devmgmt.msc” command. It is a seamless transition for anyone who spends their day in a CLI (Command Line Interface). It highlights the flexibility of Windows 11, showing that while the operating system looks modern and sleek, it still retains the powerful backbone that technical users have relied on for decades. This method ensures that no matter what environment you are currently working in, the ability to troubleshoot a driver or disable a rogue USB port is always just a few keystrokes away.
Believe it or not, some people still prefer the old-school charm of the Control Panel. While Microsoft is slowly sunsetting this legendary part of Windows, it still exists in Windows 11. If you happen to have the Control Panel open, you can find the Device Manager by navigating through the “Hardware and Sound” section. It feels a bit more “scenic” than the other methods, but for those who have spent twenty years using Windows, the muscle memory is hard to break. It is also a good reminder of how Windows has evolved, keeping these legacy paths available for compatibility and user preference while pushing the more streamlined “Power User” menu as the new standard.
Finally, if you find yourself needing to access the Device Manager frequently—perhaps you are a developer testing hardware or someone dealing with a particularly finicky peripheral—you can always create a desktop shortcut or pin it to your Taskbar. By right-clicking on your desktop, selecting “New,” and then “Shortcut,” you can type “devmgmt.msc” as the location. This creates a permanent icon on your desktop that you can double-click anytime. You can even drag this icon down to your Taskbar so that it is always one click away, sitting right next to your browser or file explorer. Having this level of accessibility ensures that you spend less time digging through menus and more time actually being productive or getting back to your gaming session.
Understanding these different pathways is about more than just opening a window; it is about taking control of your PC. Windows 11 is a powerful operating system, but it can sometimes feel like it is trying to hide its most useful tools behind a layer of “user-friendly” design. By mastering these shortcuts, you are effectively pulling back the curtain and interacting with your hardware on your own terms. Whether you choose the quick right-click on the Start button, the “devmgmt.msc” command, or a custom desktop shortcut, you are now equipped to handle any hardware hiccup that comes your way with speed and confidence.
Disclaimer: The information provided in this article has been collected from publicly available sources on the Internet. Readers are requested to verify this information with available sources.